星期五, 六月 30, 2006
ffmpeg - read_packet
av_read_packet 從input stream中讀取一個packet
實際使用 s->iformat->read_packet( )來讀。
s在av_read_packet( ) argument中的 is, is = input_file[ist->file_index];
input_file[ ] 在 opt_input_file ( )中初始化:input_file[nb_input_files] = ic;
ic 在 av_open_input_file(&ic,filename... 初始化( 取得實體 alloc )。
av_open_input_file ( ) 中 ic->iformat = fmt = av_probe_input_format( )找到format。
av_probe_input_format( ) 依序呼叫 first_iformat list中每一個node的 read_probe( )來決定是否"認識" input stream。
first_iformat 這一個list 是由 av_register_input_foramat(AVInputFormat *)設定。
grep av_register_input_format 就可以看到 libavformat 下每個source file都有呼叫這一個function來註冊自己的 read/write function。
所以省略掉 probe 找到iformat的地方不看,s ->iformat ->read_packet ( )執行的就是libavformat下有 使用 av_register_input_format( )的source code中 read_packet 對應的function。
修改source,在 libavformat/utils.c 的av_probe_input_foramt( )最後加上
make,播放 5th.m2t ,顯示 :
第二次呼叫才open file。
mpegts 的probe( )方式有點難 @_@...換一個好了...用chevy6.mpg 顯示
mpegs_probe( )就比較清楚了
probe也就是在找...mark ...
這一篇文章(http://www.mav-magazine.com/Aug1999/MPEG/),有說明用hexeditor "編輯" MPEG檔 ....@_@
實際使用 s->iformat->read_packet( )來讀。
s在av_read_packet( ) argument中的 is, is = input_file[ist->file_index];
input_file[ ] 在 opt_input_file ( )中初始化:input_file[nb_input_files] = ic;
ic 在 av_open_input_file(&ic,filename... 初始化( 取得實體 alloc )。
av_open_input_file ( ) 中 ic->iformat = fmt = av_probe_input_format( )找到format。
av_probe_input_format( ) 依序呼叫 first_iformat list中每一個node的 read_probe( )來決定是否"認識" input stream。
first_iformat 這一個list 是由 av_register_input_foramat(AVInputFormat *)設定。
grep av_register_input_format 就可以看到 libavformat 下每個source file都有呼叫這一個function來註冊自己的 read/write function。
所以省略掉 probe 找到iformat的地方不看,s ->iformat ->read_packet ( )執行的就是libavformat下有 使用 av_register_input_format( )的source code中 read_packet 對應的function。
修改source,在 libavformat/utils.c 的av_probe_input_foramt( )最後加上
fprintf(stderr,"av_probe_input_format fmt->name:%s\n",fmt ? fmt->name : "");看看最後是找到哪一個iformat。
make,播放 5th.m2t ,顯示 :
av_probe_input_format fmt->name:有兩次是因為第一次呼叫av_probe_input_format時,不open file。
av_probe_input_format fmt->name:mpegts
第二次呼叫才open file。
mpegts 的probe( )方式有點難 @_@...換一個好了...用chevy6.mpg 顯示
name:source : libavformat/mpeg.c
name : mpeg
mpegs_probe( )就比較清楚了
probe也就是在找...mark ...
000001BA : packet start.找一找video file是不是有這個pattern..用以前講過的xxd來作hexdump..
000001BB : system header start
000001E0 ~ 000001EF
000001C0 ~ 000001DE
000001BF : private stream 2
000001BC : program stream map
000001BD : private stream 1
000001BE : padding stream
$xxd -l 32 chevy.mpg果然,000001ba。
0000000: 0000 01ba 4400 0400 060d 00f4 c3fa ffff ....D...........
0000010: 0000 01bb 000c 807a 6106 21ff c0c0 20e0 .......za.!... .
這一篇文章(http://www.mav-magazine.com/Aug1999/MPEG/),有說明用hexeditor "編輯" MPEG檔 ....@_@
ffmpeg - HIS modification
上一個post是"原版"的ffmpeg 內容,接著看HIS的修改.
原av_encode ( ) 切割為兩個function :
av_encode_open_stream( ) : initialize in/out stream variable
av_encode_video_thread( ) : 真正作encoding的地方.
av_encode_video_thread
用guess_format( )猜測filename 應該使用的格式.
原av_encode ( ) 切割為兩個function :
av_encode_open_stream( ) : initialize in/out stream variable
av_encode_video_thread( ) : 真正作encoding的地方.
av_encode_video_thread
read_packet( ) then free_packet - 丟掉第一個packet(why?)重要的encoding 動作也是在do_video_out作
for(;;)
av_read_packet 從inputstream 讀取一個packet到pkt中。
decode input packet (?) why ? 不是bt656嗎?
do_video_out : encode and write out(?)
計算pts, frame同步parse_arg_file 在 parse cmdline的filename (output filename?)。
img_convert : convert picture pixel format ?? 一樣用ffmpeg的convert function,沒有用dsp作(why?)
resize : 也沒用dsp
img_resample : 也沒用dsp
avcodec_encode_video : 呼叫 encode( ) 作encode。
av_write_frame : 呼叫 write_packet 把encode好的pkt ......
s->oformat->write_packet
s : ageument of do_video_out : os
os = output_files[ost->file_index];
output_files[] 似乎是在opt_output_file 作initialize。
opt_output_file( )只有在parse_arg_file( )引用。
parse_arg_file( )只有在parse_options( )引用。
parse_options( )在 main 的一開始引用。
用guess_format( )猜測filename 應該使用的格式.
ffmeg - continue
ffmpeg.c 部份:
SIGSEGV (Segment fault) : access 一個無效的memory address時,會觸發這個signal。
從原av_encode( ) local variable 中分出來的變數:
SIGSEGV (Segment fault) : access 一個無效的memory address時,會觸發這個signal。
從原av_encode( ) local variable 中分出來的變數:
AVInputStream : *ist, **ist_table原ffmpeg.c中..
AVOutputStream : *ost, **ost_table
AVInputFile : *file_table
av_encode - 作decode-encode的functionencode的動作: do_video_out
for(;receive_sigterm==0;){
由pts找到現在要decode/encode的input - file_index
av_read_frame(input_files[file_index], &pkt)
讀出一個frame的packet。
計算out stream的delta time
output_packet(ist, ist_index, ost_table, nb_ostream, *pkt)
decode pkt to picture : avcodec_decode_video
encode picture : do_video_out
img_convert : convert source pixel format to output pixel format..
這個ffmpeg內建一個各format互轉的function table : convert_table. @_@ 真是寶庫.
img_resample : ~
avcodec_encode_video : 把處理完後的 big_pitcure encode後放到bit_buffer
av_interleave_write_frame : 把 pkt(就是bit_buffer) 包裝後寫入out stream
星期四, 六月 29, 2006
ffmpeg : custom codec - dsp
ffmpeg 設計了一個完整的架構,讓你將自己implement的dsp 加入。
例如,外加的mpeg4 codec。
ffmpeg 的application 啟動的時候,要呼叫 av_register_all ( ) 建立所有support的codec的 function table。
以下是某平台的code trace...
config.mak 中多定義了 CONFIG_MY_CODEC
grep 整個source,有CONFIG_MY_CODEC的地方
libavcodec/allcodecs.c 的avcodes_register_all( ) function,可以看到,利用CONFIG_MY_CODEC來決定使用原來的ffmpeg codec還是自己的codec (heading with g):
如果整個folder執行過 ctags -R,用
這樣還可以對應使用原ffmpeg mp4codec與custom codec的不同處。
AVCodec的 structure:
open dsp mpeg4 encoder driver dev.
將ioctl 的參數structure設定好,用ioctl(codec_fd,ENCODE_INIT,&encod_parm) 通知driver。
將AVFrame (儲存frame property and start address的結構) allocate好。
把ratecontrol parameter設好。
xvid_encode:
將傳入的YUV plane base address 取出,設定到ioctl 的arument structure。
將argument structure的bitstream (encoder的結果輸出address),
例如,外加的mpeg4 codec。
ffmpeg 的application 啟動的時候,要呼叫 av_register_all ( ) 建立所有support的codec的 function table。
以下是某平台的code trace...
config.mak 中多定義了 CONFIG_MY_CODEC
grep 整個source,有CONFIG_MY_CODEC的地方
libavcodec/allcodecs.c 的avcodes_register_all( ) function,可以看到,利用CONFIG_MY_CODEC來決定使用原來的ffmpeg codec還是自己的codec (heading with g):
#ifdef CONFIG_MY_CODEC這樣就知道codec function table name 是gmpeg4_encoder, gmjpeg_encoder。
register_avcodec(&gmpeg4_encoder);
register_avcodec(&gmjpeg_encoder);
#else
register_avcodec(&mpeg4_encoder);
register_avcodec(&mjpeg_encoder);
#endif
如果整個folder執行過 ctags -R,用
$vi -t gmpeg4_encoder這樣就可以open gmpeg4_encoder實做的source code。
AVCodec gmpeg4_encoder = {
  "mpeg4",
  CODEC_TYPE_VIDEO,
  CODEC_ID_MPEG4,
  0,
  encode_init,
  xvid_encode,
  encode_close,                               /// close
  NULL,                                       /// decode
      0
}
三個function : encode_init, xvid_encode, encode_close。這樣還可以對應使用原ffmpeg mp4codec與custom codec的不同處。
AVCodec的 structure:
typedef struct AVCodec {
   const char *name;
   enum CodecType type;
   int id;
   int priv_data_size;
   int (*init)(AVCodecContext *);
    int (*encode)(AVCodecContext *, uint8_t *buf, int buf_size, void *data);
    int (*close)(AVCodecContext *);
   int (*decode)(AVCodecContext *, void *outdata, int *outdata_size,
                 uint8_t *buf, int buf_size);
   int capabilities;
   const AVOption *options;
   struct AVCodec *next;
   void (*flush)(AVCodecContext *);
} AVCodec;
int encode_init:open dsp mpeg4 encoder driver dev.
將ioctl 的參數structure設定好,用ioctl(codec_fd,ENCODE_INIT,&encod_parm) 通知driver。
將AVFrame (儲存frame property and start address的結構) allocate好。
把ratecontrol parameter設好。
xvid_encode:
將傳入的YUV plane base address 取出,設定到ioctl 的arument structure。
將argument structure的bitstream (encoder的結果輸出address),
FIC8120 - part III : MPEG4 codec
MPEG4 Programming Guid 說明 FIC8120 MPEG4 codec的使用方式。
一樣,codec driver以kernel driver的方式提供service,driver source code也完整提供。
一樣,有example code,和source code說明。 driver IOCTL argument說明。
mpeg codec output 利用mmap的方式讓codec 將輸出mapping 到 framebuffer。
讓codec輸出顯示在bt656 output上。
encode 部份,一樣,open capture device(bt656 input),mmap input region ,用ioctl 設定給encoder 的input region。
MPEG4 Motion Detection
定義好MACROBLOCK 檔,CFG,當detect到motion動作會signal 設定好的pid process。
基本上MPEG4 的program方式和JPEG的方式類似。
FIC8120 SDK - part II : jpeg codec and motion detection
SDK中有JPEG programming guide,MPEG4 Programming Guide,說得很清楚。
JPEG Programming Guide
jpeg encoder/decoder已經由usermode program轉為kernel driver了,所以要compile module,load module後才可以使用。
說明driver source code。 source file - content.
說明 jpeg 的example program。
jpeg codec driver也是用IOCTL 控制,
以下在說明jpeg encode/decode example的source code,配合IOCTL 解釋.
FIC8120 的JPEG codec 有提供motion detection function.
工作方式是: 利用一個config 檔,設定motion detection 的region sensitive,
當程式偵測到motion detection 時,會signal 設定檔中 設定好的pid process。
Text (console) mode pdf reader ?
真的存在嗎?
google了一下似乎是沒有,所以只好用pdftohtml 將一個pdf檔轉成多個html檔,還會將pdf中的圖片轉為jpg檔。
pdftohtml會保留pdf檔中的link,讓你browse 轉換後的html file時比較方便。
console mode 的html reader ? 就是 lynx 囉。
或者,會有其他更直接的方法?
google了一下似乎是沒有,所以只好用pdftohtml 將一個pdf檔轉成多個html檔,還會將pdf中的圖片轉為jpg檔。
pdftohtml會保留pdf檔中的link,讓你browse 轉換後的html file時比較方便。
console mode 的html reader ? 就是 lynx 囉。
或者,會有其他更直接的方法?
星期三, 六月 28, 2006
Faraday : FIC8120
ARM9 core + MPEG4 Codec
CCIR656 I/O , PCI , USB OTG, Ethernet(MAC), IDE , RTC, I2C, I2S, PowerManagement.
SDK是Linux 2.4.19.
SDK中source code很完善,包括 dsp driver部份也都有。
從dsp driver中可以看到,codec與arm 之間是用share memory作interface,source code中定義好share memory command format,driver就是利用share memory mapping的structure 送command,check state, wait complete。
除了capture, codec部份,其他的device好像都在kernel source中。
所以算是很Open的作法,(就差codec部份沒有sourcecode了,但是搞不好是cell gate implement也不一定)。
FIC8120 可以做到realtime D1 30fp mp4 壓縮 或 解壓縮 (目前的clock rate還不能做到同時)。
所以適合作 ..
IPCAM : 從bt656 capture image ,壓縮成mp4後stream out , via buildin ethernet 或由PCI接Wlan out。當然,是linux ,所以可以內建http server,snmp... etc,你高興的server都可以。
Location Free : 如圖
以上兩個產品,如果加上stream server的話,應該可以做到多組接收吧。
有I2S/AC97,所以audio in/out都不是問題。
IDE & SD controller -- 可以幹嘛? 沒想到。
一顆單價大概是12塊(? 忘了)。
contact window : 忘了問...
以後再寫一些這個的SDK內容...
CCIR656 I/O , PCI , USB OTG, Ethernet(MAC), IDE , RTC, I2C, I2S, PowerManagement.
SDK是Linux 2.4.19.
SDK中source code很完善,包括 dsp driver部份也都有。
從dsp driver中可以看到,codec與arm 之間是用share memory作interface,source code中定義好share memory command format,driver就是利用share memory mapping的structure 送command,check state, wait complete。
除了capture, codec部份,其他的device好像都在kernel source中。
所以算是很Open的作法,(就差codec部份沒有sourcecode了,但是搞不好是cell gate implement也不一定)。
FIC8120 可以做到realtime D1 30fp mp4 壓縮 或 解壓縮 (目前的clock rate還不能做到同時)。
所以適合作 ..
IPCAM : 從bt656 capture image ,壓縮成mp4後stream out , via buildin ethernet 或由PCI接Wlan out。當然,是linux ,所以可以內建http server,snmp... etc,你高興的server都可以。
Location Free : 如圖
這像一組可以用來取代video cable。
Video IN ==> SAA7117 ==> BT656 ==> FIC8120 =MP4 stream --WLAN

WLAN -- FIC8120 ==> Video out
以上兩個產品,如果加上stream server的話,應該可以做到多組接收吧。
有I2S/AC97,所以audio in/out都不是問題。
IDE & SD controller -- 可以幹嘛? 沒想到。
一顆單價大概是12塊(? 忘了)。
contact window : 忘了問...
以後再寫一些這個的SDK內容...
ffmpeg - on Sarge stable - why XOpenDisplay not found ?
在真正的開發環境上install ffmpeg :
ffplay_g是沒有strip的版本,可以gdb 來run。
奇怪的問題: testing 的ffmpeg為甚麼不能使用XOpenDisplay ?
查XOpenDisplay是declare在 /usr/include/X11/Xlib.h ,
sourcecode中,只要有 define __linux__ 就會include X11/Xlib.h 進來。
用 這一篇 http://lists.debian.org/debian-devel/2001/01/msg00979.html 的方法,可以偵測出compiler是否有define __linux__。
沒錯,因為make error是發生在link,不是為宣告,所以X11/Xlib.h是有include。
問題是X lib 沒有link進來..
用ldd check一下stanble (OK)的ffplay,看看link到哪些X11 library..
在testing搜尋一下..嗯。位置不一樣...
- 先在proxy server上run netselect-apt,找到source mirror site。
- 將netselect-apt 的source.list中deb src 的那一行copy到dev platform的source.list上(dev platform 是用CD ROM裝的,所以沒有src link。
copy 完後,修改/etc/apt/apt.conf (follow以前的post)。
記得proxy server要把dev platform加入Allow。
run apt-get update - apt-get source ffmpeg
- 取得20050313(跟testing果然不一樣)
- apt-get install libsdl1.2-dev
- 到ffmpeg 下run config
檢查一下 CONFIG_SDL=yes 這樣sample program : ffplay才會build。 - make
這一個版本不需要修改XOpenDisplay,
如果需要,才run make install (root)
ffplay_g是沒有strip的版本,可以gdb 來run。
奇怪的問題: testing 的ffmpeg為甚麼不能使用XOpenDisplay ?
查XOpenDisplay是declare在 /usr/include/X11/Xlib.h ,
sourcecode中,只要有 define __linux__ 就會include X11/Xlib.h 進來。
用 這一篇 http://lists.debian.org/debian-devel/2001/01/msg00979.html 的方法,可以偵測出compiler是否有define __linux__。
沒錯,因為make error是發生在link,不是為宣告,所以X11/Xlib.h是有include。
問題是X lib 沒有link進來..
用ldd check一下stanble (OK)的ffplay,看看link到哪些X11 library..
libX11.so.6 => /usr/X11R6/lib/libX11.so.6這兩個。
libXext.so.6 => /usr/X11R6/lib/libXext.so.6
在testing搜尋一下..嗯。位置不一樣...
stable 在 /usr/X11R6/lib 下但是為甚麼link不到?
testing 在 /usr/lib
新加坡 為何有權、有廉、又有能?
這是這一期天下雜誌的標題。
內容又是歸就到領導人的問題。
其實在freedom.org中,台灣民主程度已經列為世界第一。
媒體自由程度也和日本並列世界第一。
這樣人民高度自主,又有超級自由媒體環境下。
政治機關出了問題,就是人民自己的問題,因為是你自己投票選出來的。
怪誰? 怪自己。
:P
內容又是歸就到領導人的問題。
其實在freedom.org中,台灣民主程度已經列為世界第一。
媒體自由程度也和日本並列世界第一。
這樣人民高度自主,又有超級自由媒體環境下。
政治機關出了問題,就是人民自己的問題,因為是你自己投票選出來的。
怪誰? 怪自己。
:P
Another microkernel - kaneton
OSNews 介紹的又一個新的microkernel : kaneton,
法國人做的(據說是兩位學生),以教學為目的。
所以"易懂"與"大量的文件"是這個project的兩項特色。
其他像.. POSIX compliant, efficency..之類的都是次要因素。
也因此他可以完全遵守microkernel的精神-- 完全以message作為service間溝通的方式。
其他還有很多特點,光是OSNews的文章就寫了圖文並茂的7頁 : http://www.osnews.com/story.php?news_id=15018&page=1
但是... 他不是OpenSource !!
所以,說這麼多,也是白搭,除非你去那間法國學校就讀,選那們課,才會有機會看得到這一個據說是從bootloader到所有kernel source都是非常容易看得懂的microkernel的sourcecode。
OSNews這一篇文章後面的comment也都是這樣的評語
...說得天花亂綴,文件再多也沒有,沒有code可以看和修改,甚至沒有binary可以run,那樣跟國王的新衣有甚麼不同.....
星期二, 六月 27, 2006
Pika - MCX and Media Center
Microsoft推出Media Center雖然不怎麼成功。但是還是沒有放棄。
像下一代的Windows - Vista,就會大量加入Media Center的功能,
讓Media Center PC成為每一個家庭的Media Server。
除此之外 Microsoft也開始了Median Center的Client端的計畫......
MCX : Media Center Externsion
Media Center原本只包含Median Streaming 與play list的部份。
現在MCX補足了UI的部份。
所以你的 device只要有這兩部份,就可以播放Media Center的所有媒體,也可以控制Media Center,同時也讓你的 device與 Media Center有一致的操作方式。
這個Media Center Extension 就叫做 "Pika"。
Microsoft也為所有有興趣的家電業者,提供了一個mxc partner program。
讓大可以取的最新消息,同時提供意見回饋。
至於hardware mcu 的合作廠商,目前好像只有看到SigmaDesigns的8622L chip有提供Pika EVB(台灣的contact windows請找一下這個blog,大概在2005年年尾的archive..)。
詳細的消息在 Chris Lanier's Blog 中寫得比MS網站還來得詳細:
需要製作投影片向老闆申請經費的PM們可以用google image搜尋 " mcx microsoft ",
可以找到microsoft幫你們做好的許多精美的 use scenario diagram。為你擘畫MCE + MCX的願景,包管讓您拿到大筆的經費。
在PM手下的RD們也不要介意,
依照慣例,MS應該會做好很多漂亮方便的 tools,讓你點一點,拉一拉 就完成一個產品。而且保證與你實力堅強的競爭廠商做出來的產品相差不到1%。
只要你準備好一些錢向這些hardware ready 的partner購賣SDK,和向MS談妥license就可以。
以上所述,如果與事實不符(或雷同),本人不負任何責任。 :P
像下一代的Windows - Vista,就會大量加入Media Center的功能,
讓Media Center PC成為每一個家庭的Media Server。
除此之外 Microsoft也開始了Median Center的Client端的計畫......
MCX : Media Center Externsion
Media Center原本只包含Median Streaming 與play list的部份。
現在MCX補足了UI的部份。
所以你的 device只要有這兩部份,就可以播放Media Center的所有媒體,也可以控制Media Center,同時也讓你的 device與 Media Center有一致的操作方式。
這個Media Center Extension 就叫做 "Pika"。
Microsoft也為所有有興趣的家電業者,提供了一個mxc partner program。
讓大可以取的最新消息,同時提供意見回饋。
至於hardware mcu 的合作廠商,目前好像只有看到SigmaDesigns的8622L chip有提供Pika EVB(台灣的contact windows請找一下這個blog,大概在2005年年尾的archive..)。
詳細的消息在 Chris Lanier's Blog 中寫得比MS網站還來得詳細:
- Hardware, operating system, and middleware independence and adaptability
- OEM-local user interface flexibility and extensibility
- Based on DLNA 1.0 framework and protocols (including an optional DLNA stack implementation)
- Reliable wired and wireless network AV streaming
- Standard and high-definition graphics and video
- Support for Windows Vista-compatible premium digital TV, including U.S. Digital Cable (Open Cable)
- Simple, inexpensive OEM licensing
需要製作投影片向老闆申請經費的PM們可以用google image搜尋 " mcx microsoft ",
可以找到microsoft幫你們做好的許多精美的 use scenario diagram。為你擘畫MCE + MCX的願景,包管讓您拿到大筆的經費。
在PM手下的RD們也不要介意,
依照慣例,MS應該會做好很多漂亮方便的 tools,讓你點一點,拉一拉 就完成一個產品。而且保證與你實力堅強的競爭廠商做出來的產品相差不到1%。
只要你準備好一些錢向這些hardware ready 的partner購賣SDK,和向MS談妥license就可以。
以上所述,如果與事實不符(或雷同),本人不負任何責任。 :P
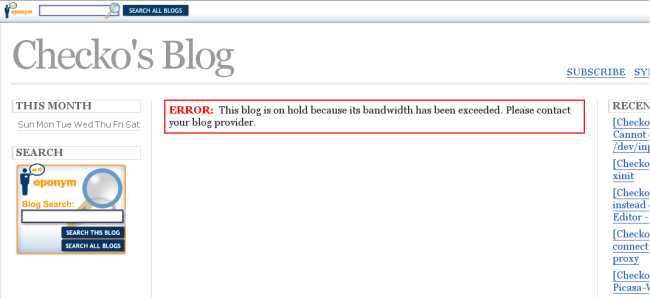
exceed transfer allowance : Eponym
收到一封mail :
前一陣子因為blogger一直"維修中",加上種花電信一直把blogspot當作惡意網站.. orz...
所以想找個備份blog host,以防萬一。
當初心理盤算好,利用blog by mail 功能和blogger的自動通知工能和gmail的filter-forward方式做到同步post的動作。
所以找到這一家 https://secure.eponym.com/signup/
結果...寫不到幾篇,就出現..

然後就通知請購買upgrade頻寬的點數.
果然免費的就連"堪用"都做不到。唉。
The following blog has been placed on-hold because it has exceeded its transfer allowance. To reactivate your blog please visit https://secure.eponym.com/upgrade/ to purchase an upgrade package that includes an additional bandwidth transfer amount.想不到我這種小水管的blog,竟然也會超過100M。
All upgrade packages include additional disk space and bandwidth, email support, custom domain support, and the ability to remove all eponym.com branding and ads. Go to https://secure.eponym.com/upgrade/moreinfo.php for more information.
Username: checko
Hostname: checko.eponym.com
Allowed: 100MB
Used: 107MB
Thank you for using Eponym.com!
前一陣子因為blogger一直"維修中",加上種花電信一直把blogspot當作惡意網站.. orz...
所以想找個備份blog host,以防萬一。
當初心理盤算好,利用blog by mail 功能和blogger的自動通知工能和gmail的filter-forward方式做到同步post的動作。
所以找到這一家 https://secure.eponym.com/signup/
結果...寫不到幾篇,就出現..
然後就通知請購買upgrade頻寬的點數.
果然免費的就連"堪用"都做不到。唉。
星期一, 六月 26, 2006
startx fail : Cannot open device /dev/input/mice
上次還動得好好的,今天要進入X時,卻出現Error :
用Xorg下命令試試:
看看有沒有load mouse driver :
安裝後(modpeobe mousedev)試試,果然OK了@_@.
這是甚麼原因呀,誰把我的mousedev unload了???
(EE) xf86OpenSerial: Cannot open device /dev/input/mice是沒有mouse ?
No such device.
用Xorg下命令試試:
$Xorg -allowMouseOpenFail成功,但是果真沒有游標。
看看有沒有load mouse driver :
$lsmod | grep mouse到另一台機器去看看...
psmouse
$lsmod | grep mouse所以是沒有load mousedev ?
mousedev
psmouse
安裝後(modpeobe mousedev)試試,果然OK了@_@.
這是甚麼原因呀,誰把我的mousedev unload了???
X - startx - xinit
一般啟動X都是用startx。
/usr/bin/startx 是一個shell script..
到處找設定檔,如果沒有,就用default。
將$client, $clientargs, $server, $display $serverargs 這些參數都設好。
最後,用
xinit是一個程式,man 一下 ..X Window System initializer。
xinit其實是一個為X client開啟X Server的程式,所以理論上要給定 client 作為argument。
如果執行xinit時沒有給定argument,xinit就會子動採用以下command作為argument:
xinit的另一個特性,就是在client結束後,也會同時關閉X Windows。
不知道是不是真的是這樣..
/usr/bin/startx 是一個shell script..
到處找設定檔,如果沒有,就用default。
將$client, $clientargs, $server, $display $serverargs 這些參數都設好。
最後,用
xinit $client $clientargs -- $server $display $servargs啟動X Windows。
xinit是一個程式,man 一下 ..X Window System initializer。
xinit其實是一個為X client開啟X Server的程式,所以理論上要給定 client 作為argument。
如果執行xinit時沒有給定argument,xinit就會子動採用以下command作為argument:
xterm -geometry +1+1 -n login -display :0也就是說,單純的執行xinit,會在X windows下啟動一個xterm。
xinit的另一個特性,就是在client結束後,也會同時關閉X Windows。
不知道是不是真的是這樣..
Use VIM instead of VI as the default Editor - update-alternative
Debian 剛裝好時,是沒有安裝VIM的(只有安裝VI),所以也發生過幾次 number, syntax on沒辦法動作,而找了很久的情況(結果發現是VI,不是VIM)。
安裝了VIM後,要更改default edior,debian要用"update-alternative" 這個command。
OK!
結果沒有這麼簡單...-___-.
看看 vi 的位置:
update-alternatives 這個command就是用來更改/etc/alternatives下的link。
所以剛剛改錯了,應該用..
安裝了VIM後,要更改default edior,debian要用"update-alternative" 這個command。
#update-alternative --config editor輸入 4
There are 4 alternatives which provide 'editor'.
Selection Alternative
--------------------------------------
1 /bin/ed
** 2 /bin/nano
3 /bin/nvi
4 /bin/vim
Press enter to keep the default[*], or type selection number :
OK!
結果沒有這麼簡單...-___-.
看看 vi 的位置:
$which vi再看看/etc/alternatives.vi..
/usr/bin/vi -> /etc/alternatives.vi
/etc/alternatives/vi -> /usr/bin/nvi
update-alternatives 這個command就是用來更改/etc/alternatives下的link。
所以剛剛改錯了,應該用..
#update-alternatives --config vi然後選vim。
apt-get : connect source list by proxy
Debian stable的一些package版本都太舊了一些,所以都要用testing 或 unstable。
這兩種都沒有辦法用CDROM安裝,都要連到網路上,所以,需要用proxy。
apt-get proxy的用法:
debian安裝完後,在/etc/apt下沒有apt.conf,所以要從 /usr/share/doc/apt/examples下copy過來。
copy完後,在 "Acquire" 那個{ } section中,加上:
可惜netselect-apt 這個command不聽apt.conf的話,所以firewall後面的debian 主機沒辦法用netselect-apt找到最佳source site。
這兩種都沒有辦法用CDROM安裝,都要連到網路上,所以,需要用proxy。
apt-get proxy的用法:
debian安裝完後,在/etc/apt下沒有apt.conf,所以要從 /usr/share/doc/apt/examples下copy過來。
copy完後,在 "Acquire" 那個{ } section中,加上:
Http就可以了。
{
Proxy "http://10.3.3.194:8888";
};
可惜netselect-apt 這個command不聽apt.conf的話,所以firewall後面的debian 主機沒辦法用netselect-apt找到最佳source site。


